|
Got the all-clear to post about some of the projects that I have been observing in the lab! I'm very excited to get to show you what all I have been able to see.
Stay tuned for posts!!
1 Comment
Guess who became well acquainted with the lab's 3D printer this week. Almost too acquainted. For one of the graduate student's experiments, over 10 pieces of galvanotaxis apparatus had to be printed, Naturally, as the lab intern, I was first in line for the job. Galvanotaxis is the directional migration of an organism with a change in electric charge, so for this experiment I was to print an apparatus that would make galvanotaxis experiments easier to do with cells. Picture a hockey puck with chambers. That's what I printed.  Note the galvanotaxis apparatus on the computer screen. As the graduate student had already designed the apparatus itself, my sole assignment was to print them, so this week, like many of the past weeks, involved a lot of patience and waiting. (This internship has taught me many more valuable lessons than I ever thought it would - an unforeseen aspect of the project for which I am incredibly grateful.) The steps to printing this apparatus were fairly simple:
Repeat this procedure 10 times, and then you have a basic layout of my week at the lab. Besides just printing these cell chambers, however, I did get to "fix" the printer at one point in this week. On the last day of printing, I realized that the printer's bed had been moved to the point where it wasn't level anymore, so it would get stuck and stop printing. As I am one of the two people who uses the printer, and other student asked me to fix it, I had the honor of getting acquainted with the user manual for this particular model. This was, in all honesty, the highlight of my week, because in order to see if I had leveled the bed correctly, I got to print little dinosaurs.
On a different note, remember the BioStamp project from Week 2? Its technology has been featured on Tucson News Now. (click below for the link) Thoughts after this week:
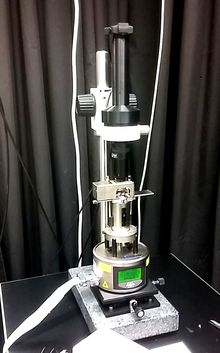
This week we poked polymers! Well, tried to. Our goal this week was to create a detailed three-dimensional image of the topography of the different polymers so that we could see how the surface changed based on the solvent used to create the polymer and the method of creation used (spin coat, melt press, or drop cast). The topography is important, as a rougher surface means increased adhesion to surrounding cells and other objects. In order to do this, we made our way back to the exotic lab to use an Atomic-force microscope (AFM).
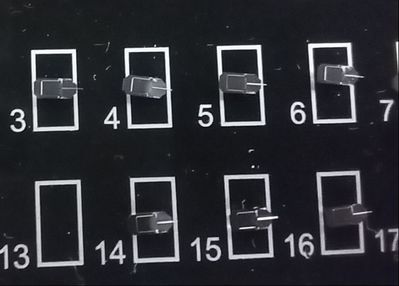
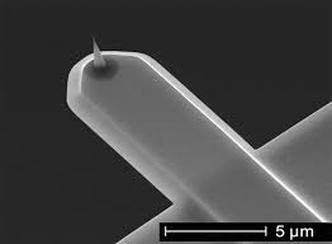
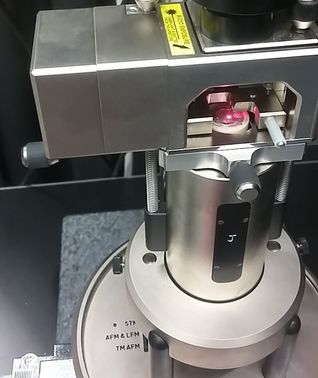
The way this microscope works can be a little bit difficult to understand (so bear with me). In standard contact mode, the tiny tip on the underside of a flexible cantilever (see images of cantilever below) scans across a surface (with changes in the height of the surface causing changes in the bending of the cantilever). Because the tip of the cantilever is touching the surface, strong repulsive forces also cause the cantilever to bend as the tip passes over the various features of the surface. While it scans, a laser is pointed at the top of the cantilever, and any bending of the cantilever will causes changes of the position of the reflected beam. A detector tracks and records the changes in the reflected beam, which allows an image of the topography of the surface to be produced. 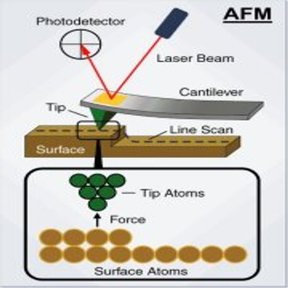 This type of microscopy has its downsides though. The tip on the underside of the cantilever is very small and sharp, so it could damage the polymer as it is scanning or get stuck. The solution? Non-contact AFM. Here the cantilever oscillates just above the surface as it scans, basically quickly poking the surface without actually touching it. As the tip approaches the surface, the forces between the tip and object cause the amplitude of the cantilever's oscillation to decrease. A feedback loop corrects for changes in amplitude and thereby keeps the cantilever from running into the surface, even with the constantly changing height. Here, the reflected laser beam as well as the changes in the oscillation amplitude are what create an image of the surface topography. As confusing as this microscope can be, it is amazing in that it is incredibly detailed and can measure by fractions of a nanometer. That's tiny. Molecule size tiny. 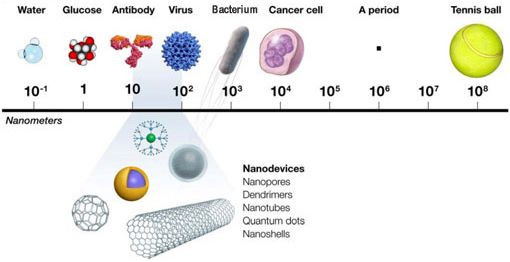 A nanometer comparison.... Using this microscope meant setting up the microscope first, and my limited (well, nonexistant) knowledge of how to do so meant this included a lot of watching and learning. The first step was to equip the microscope with a probe. These are the little devices that would be doing the polymer "poking". They were very very small and as we learned, also very easy to lose (don't worry, we found #13 eventually).
Setting it into the machine correctly was the rather tricky part. To do this correctly, we had to place it on the mount of the microscope that holds the probe, adjusting it until a light is illuminating only the needle (cantilever) end of the probe.
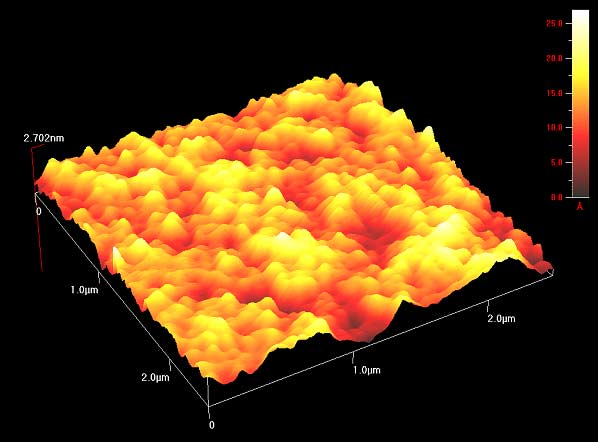
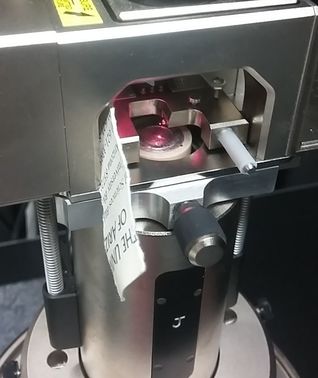
This led us to another day in the exotic lab, starting fresh with high hopes for better results. Luckily, we succeeded.  Scanning the topography of one of the polymers! This day was exciting as we finally got some great images of the polymer itself. While I don't have any pictures of the final 3-D product, imagine the rolling hills of Austin, TX. That's what some of them looked like. Our luck didn't last though, as after a few polymers the machine stopped scanning. There seems to be room for improvement. All in all, a successful week. Thoughts after this week:
Until next week! Maren Hello all!
I know that my blog posts have been pretty sparse (or nonexistent) lately. For the past few weeks, I have been working with more developing research from the lab, so I am still awaiting an email from my advisor regarding the confidentiality of this research. Best case scenario: I get the all-clear and can post what I wrote for weeks 4, 5, and 6. (These are some of my favorite posts that I've written thus far, so I'm hoping that this is the case.) Worst case scenario: I rewrite those posts to eliminate all references to research and my future posts will be far vaguer - less about why I'm doing the things that I'm doing in the lab, more about the specific experiments and procedures I'm shadowing for (without context). Here's to hoping that I get the all-clear! Maren This week wasn't quite as exciting as the past few weeks have been as I haven't been in the lab, but it was still a very informative week. Because this week was spring break at the U of A, the person that I shadow (as well as almost every other person at the lab, save for maybe one person) was out on vacation. What I didn't know, was how tight-knit this lab community is. It's a family. A lab family. Half of them all went together on a spring break road trip, instead of with other friends or family. Adorable. While this warmed my heart, it also gave me little to do, so I spent my week doing what I have spent my entire project avoiding. Reading. My supplementary Medicine by Design book was the guilty weight on my shoulders that I tried my best to ignore. It just sat on my desk, untouched, waiting for someone (me) to read it. The guilt of not doing anything this week would have been worse than the guilt of not reading it (clearly some calculated moves here), so I picked it up and began to read. In the first few hours of reading, I really felt like I was putting solid work into my project because that is exactly what reading felt like - work. It was repetitive and centered less around specific cases in which biomedical engineering was used (which I had originally hoped), and more about the importance of the field and how it has evolved. While these first few hours were a little tough and needed a pep-talk or two about how I can't just give up on a book that I required myself to read, my luck eventually changed for the better. I ended up really liking the book. It picked up its pace and gave more wide-ranging examples of different medical technologies and the people that they have benefited. It strengthened my desire to study biomedical engineering for my undergraduate degree and made me even happier with my dream to go into medicine. All in all, I'd definitely recommend it (but skip past the first few chapters if you must). Thoughts after this week:
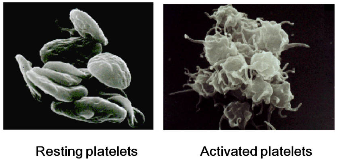
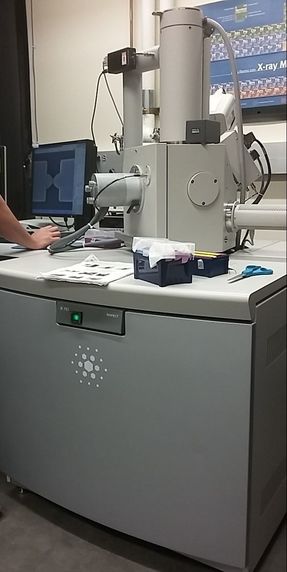
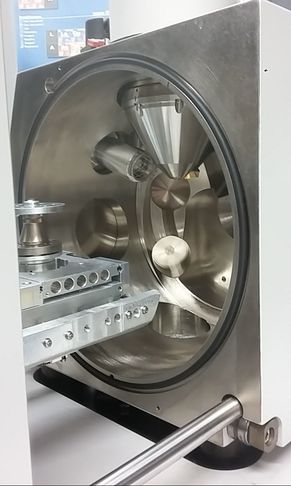
Until next week! Maren Remember back in week 2 when I mentioned that there is a possibility for the biodegradable polymer to activate platelets? That was what my week circled around. We needed to find out how many platelets were activated due to the presence of the polymer, so after a static test in which plasma (with platelets and the proteins that allow them to aggregate) was allowed to rest on the polymer, we made our way to a different lab (field trip!). This new lab was impressive, with many machines larger than I am (granted, not a tough height to beat). The downside? I was probably not allowed to be there, so I maintained a low profile and told myself to touch nothing. In order to see how many platelets had activated and aggregated, we used a scanning electron microscope (SEM). This microscope sends a beam of electrons onto the surface of the object, and detectors create a signal off of the back-scattered electrons, x-rays, and secondary electrons that are ejected from the sample after the beam hits the sample's atoms. The computer then uses this signal to create a detailed image of the topography of the sample. 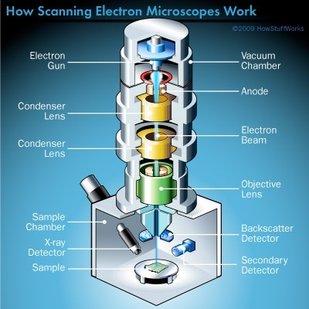 Before we could get to mapping out the surface of the polymer, we had to prepare our samples. First, we cut up our polymer samples and placed them on little discs compatible with the SEM. (This part was rougher than I had anticipated - apparently I am not as nimble with double sided tape as I had originally thought. Needless to say, this internship has been an incredibly humbling experience.) 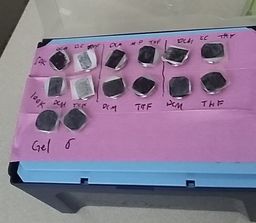 Our next step was probably the most exciting. Here is where goldsmithing met chemical science. When an electron beam is focused on non-conductive material (such as platelets or polymers), there is a possibility for the subject to become charged. This can cause the microscope to misread the surface and create an inaccurate image. The solution? Sputter-coat the surface of the polymer in gold. 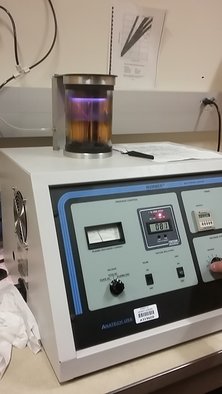 Here the samples were placed into cylinder and sputter-coated. (The name "sputter-coating" doesn't give this cool process justice. I was disappointed.) The glowing means that the coating is being applied. To allow this process to take place, a few steps need to occur. First, you increase the pressure in the chamber. This will helps the gold adhere to the surface. Then, argon gas is pumped into the chamber to cleanse it. Finally, a thin layer of gold is spread across the surface, allowing the SEM to accurately read the surface of the polymer.  Gold-coated polymer After our samples were finally prepared, we could start viewing them under the microscope.
This is where things got a bit boring. What I didn't know walking into this was how much time is spent waiting for the image to be created and how much more time is used looking for these tiny platelets. Hours. Many hours. This was slow and tedious and made me realize, once again, that patience is a virtue not granted to all (i.e., me). Looking for platelets only a few micrometers in diameter made the little discs seem endlessly large. It was like looking for a ring on a football field - possible, but time-consuming. We didn't even find any activated platelets. Although a bit frustrating (well, looking for hours for something that isn't there), this is good news! This means that the biodegradable polymer likely doesn't cause many platelets to activate (such as so many other surfaces do), reducing the risk of the polymer causing blood clots if used as a stent. While I don't have any cool pictures of activated platelets (because we couldn't find any), here is a cool something that we did find. Maybe a dust. 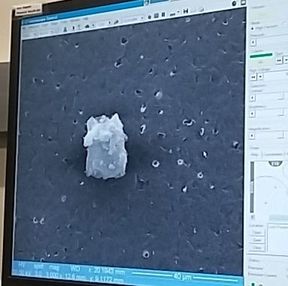 Thoughts after this week:
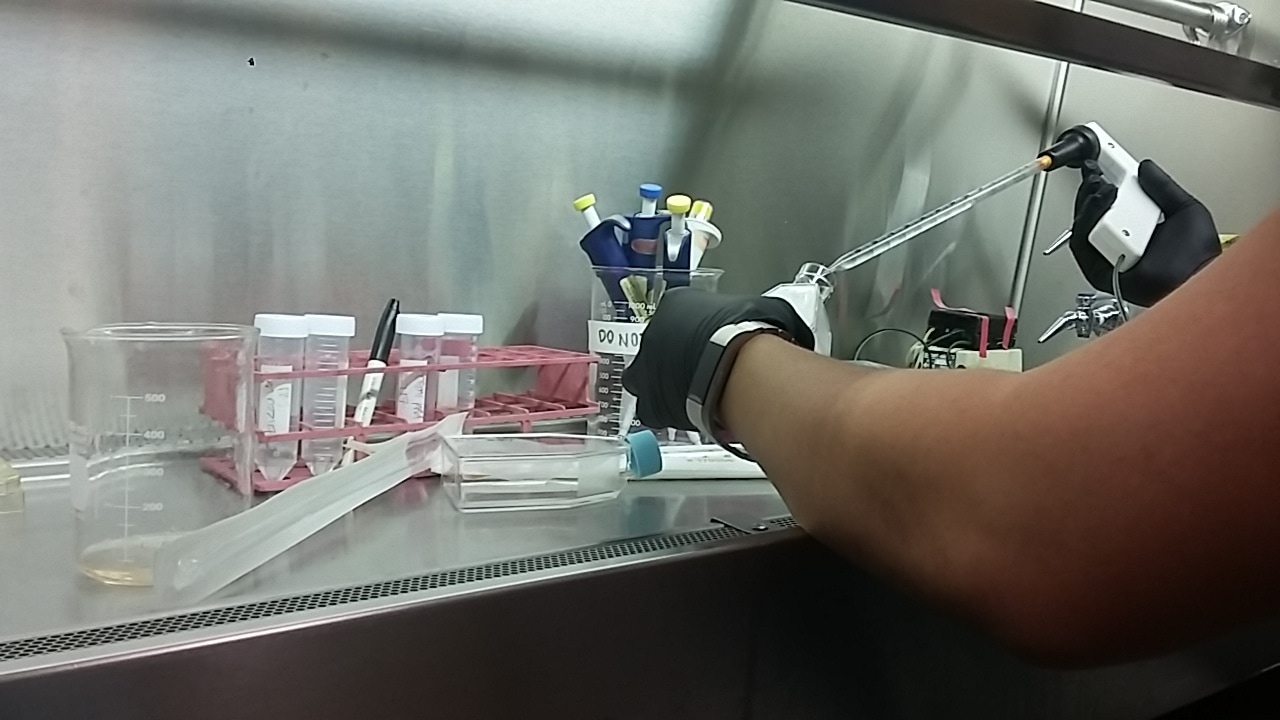
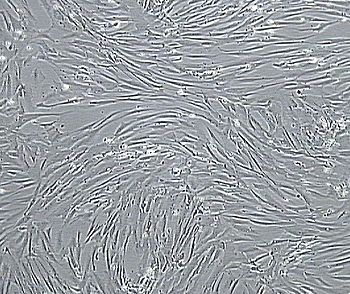
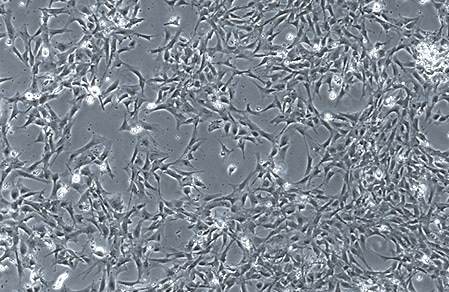
Until next week! Maren If you end up being 1 of the approximately 1,000,000 Americans to receive a stent annually, the journey may not be over. When a stent (a mesh tube used to help keep weak/narrowing coronary arteries open, usually made of stainless steel or a cobalt alloy) is placed into a coronary artery, damage to the surrounding cells occurs. The problem, however, is in how these tissues sometimes repair themselves. The endothelial cells lining the vessel play an important part in inhibiting smooth muscle cell growth, and when these cells are damaged due to injury, the underlying smooth muscle cells can abnormally overproduce until the endothelial cell layer is repaired (sometimes leading to neointimal hyperplasia). 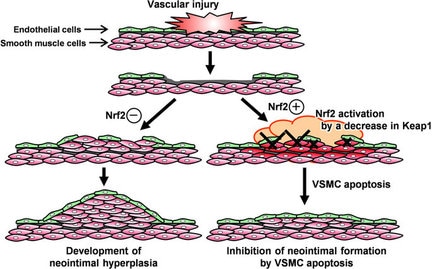 The right scenario demonstrates how a vessel should repair itself. The left demonstrates smooth muscle cell overproduction, in this case due to a deficiency in the Nrf2 protein. When this overproduction of vascular smooth muscle cells occurs, the artery wall narrows. If a stent is placed (causing artery wall injury) and either this or scar tissue formation occurs, cells grow over the stent and cause re-narrowing of the artery wall - a phenomenon known as in-stent restenosis.  A diagram of in-stent restenosis. This is why stents sometimes need to be replaced. In-stent restenosis means that the stent needs to be replaced, a procedure that causes serious damage to the coronary artery as the stent is now embedded in its wall. Furthermore, 20-40% of these vessels restenose after the replacement, requiring another repeat procedure. The aforementioned biodegradable polymer (from week 3) would be able to diminish the need for stent replacement due to in-stent restenosis as it wouldn't harm the surrounding endothelial cells the way a metal stent would. 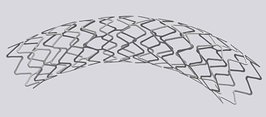 A common metal mesh stent - described by the student I'm shadowing as "gnarly". Going off of that, in order to see how well endothelial cells and smooth muscle cells adhere and react to the biodegradable polymer, we needed to culture cells. I loved this part of the week. For those that don't know, I have a passion for growing plants, so I felt very much "in my element". The steps we took to culture cells:
*roll over the pictures below for captions* This week I also had the honor of being able to attend an event for both BME undergraduate and graduate seniors who displayed their research for judges. This was an extremely informative experience as I got to see years and years of various different kinds of BME research in a few short hours. It showed how BME can be applied to the real world - from eliminating developed countries of autoimmune disorders to helping monitor pill intake of the elderly. 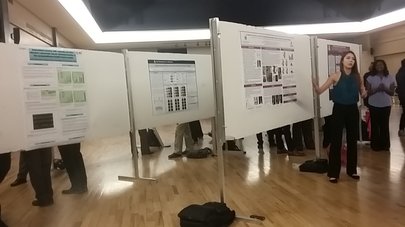 Undergraduate students rehearsing before presenting their work to the judges. 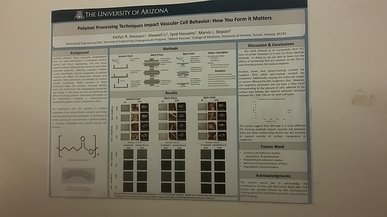 The biodegradable polymer research also made its debut... Thoughts after this week:
Until next week! Maren Sources: http://circinterventions.ahajournals.org/content/4/1/104 http://www.nature.com/articles/srep26291#f7 http://www.healthcentral.com/heart-disease/ask-doctor-44707-70.html While this week was less exciting than last week, it was still an incredible experience. On Monday I began by showing my procedure for the CPR experiment to the student leading it. I was told it is a "good procedure" and that we will be using it. What a relief. That being said, this week has focused mainly on CPR - I'm beginning to see myself as a bit of an expert in it. I have read more studies on CPR and its proper execution than I wish to admit, and all while listening to Stayin' Alive by the Bee Gees. Exciting, I know. After we reviewed the procedure, I had the honor of being formally taught how to perform CPR on a dummy that we affectionately named "Chad". It was an interesting experience, and I learned a lot, but what struck me the most was how incredibly bad I am at performing CPR. The YouTube videos made it look so easy. Am I slightly worried for my aspiring medical career? Yes. Am I going to "bulk up" like the trainer suggested? Unlikely. Here are a few tips I learned on how to perform CPR properly:
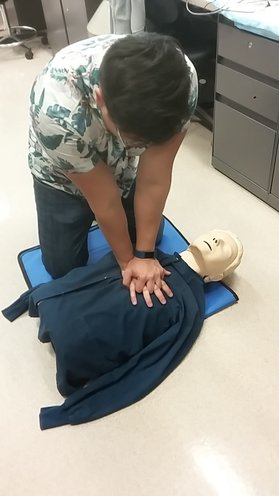 The trainer is showing me how to properly position the hands for CPR on Chad After learning for the CPR experiment, I got to learn how to use a syringe pump. More accurately speaking, I got to try to figure out how to use a syringe pump because neither I, nor the person I was shadowing, knew. We need this pump to be able to pump platelets through a tube lined with a biodegradable polymer in order to see how many of these platelets activate because of the polymer. The goal here is to be able to use the polymer to develop stents, but if it activates too many platelets, it could cause blood clots. Not the best of ideas. Luckily, our combined efforts got the pump to work, and the project will hopefully be underway with actual platelets (instead of water) very soon. 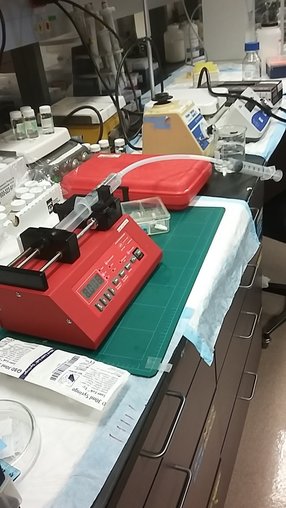 The syringe pump. It pumps and withdraws liquid from one syringe to the other. The next challenge will be eliminating the air caught in the tube (which would transfer to the syringe with platelets) and cutting down the tube in order to reduce the amount of needed platelets Thoughts after this week:
Until next week! Maren This week was, in one word, incredible. Wednesday was the beginning of my internship as it was my first day in the lab. To get started, I met with a lab technician who gave me an in-depth tour of the lab, all of its equipment, and some of the various projects that are currently underway. At the moment, the Sarver Heart Center is focusing most of its efforts on studying platelets – what causes them to activate (and subsequently aggregate). This platelet activation is what causes blood clots to form, so its study is important in minimizing heart attacks and strokes. The tour was incredibly information-rich and technical. While I learned a lot, knowing more about platelets would definitely have helped me going into the lab. A run-down of some of the things I learned during this tour:
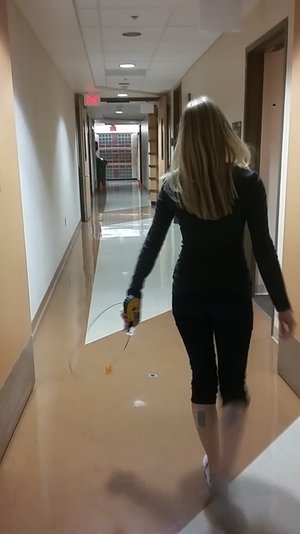
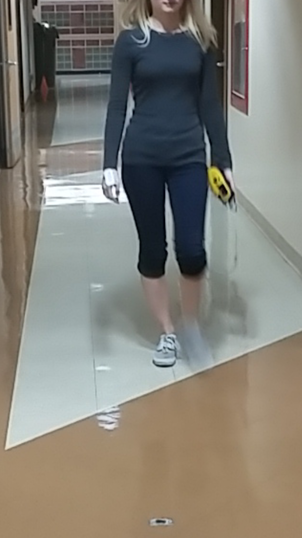
 After the tour, I was introduced to a few undergraduate BME students at the University of Arizona who are using BioStamp Sensors to create signatures on movements based on acceleration and EMG patterns. EMGs are electromyograms - they pick up the tiny electrical signals motor neurons give off that cause a muscle to contract. They are also using these sensors, however, to help in carrying out Six-Minute Walk Tests. That's where I got to help. A Six-Minute Walk Test (6MWT) is a measure of aerobic exercise capacity. It measures the heart rate, blood pressure, fatigue, and neuromuscular function of a person walking for 6 minutes, often times to show the heart function before and after a patient has had a medical intervention, or to show the progression of disease over time. Because the experiment we were carrying out is in its early stages, we started with healthy subjects in order to see if the results are accurate or significant enough to be extended to patients with heart complications. We started testing this on Wednesday, and on Friday, I got to be one of those subjects.
The problem with this test was that normal blood saturation level should be around 95-100%, but mine was at about 82% during the entirety of the experiment. My heart rate read to be about 115 as well. Yikes. We spoke to the medical student that was assisting us after and he said that with a blood saturation level of 82% percent I would not be able to be talking to him. The conclusion? My index finger was too small for the pulse oximeter. We might repeat the trial using a thumb, but it might not be needed. I was also given homework this week. One of the students that I am shadowing is creating a CPR experiment using pressure sensors and a BioStamp to show the discrepancy in the execution and effectiveness of CPR between how people who have not been trained in it and people who have. The Sarver Heart Center was one of the leaders in advocating for CCO CPR (chest compression only CPR) and puts emphasis on the importance of training people how to properly perform CPR, so this experiment is right up their alley. I am, however, to design the procedure for the experiment. Wish me luck. Thoughts
Until next week, Maren This week marked the beginning of my BASIS Senior Project.
While I wasn't able to start the internship itself this week, this has been an important week in setting myself up for a successful project. The transition away from a classroom setting has been quite strange. I am no longer in the learning environment that I have been accustomed to, so sitting down and working has been more of a challenge than I had hoped. Because of this, I found myself back at school to work on my project more than once this week, which, while being strange, was very useful in getting work done. I was able to change the parameters of the final project that I am working towards (with the help of my BASIS advisor), plan out exactly what I would be doing in the lab, and begin researching by reading my books regarding the field (listed below). Needless to say, I am extremely grateful to be able to intern in a lab setting. Until next week, Maren Books: 1) Introduction to Biomedical Engineering (textbook) 2) Medicine by Design: The Practice and Promise of Biomedical Engineering |
AuthorHello! I'm Maren, a high school senior and aspiring BME student. My goal is to share my experiences as I dive into the field of Biomedical Engineering. If you have any questions or remarks, please don't hesitate to leave a comment! Archives
April 2017
Categories |
 RSS Feed
